
Building a Centralized Documentation Hub Part 2
In Part 1, we decided on a toolchain for creating a centralized docs hub. In this part we go through the infrastructure required to provision deployment to Azure.
Setup
First, you’ll want to create your project for the docs hub. This will consist of docusaurus deployed as an Azure SWA, as well as defining some base c4 diagrams that other projects can reference and use to save duplication and to allow diagrams to be rendered both individually from the project repository as well as centrally and all linked together.
Prerequisites
You will need to install and have the following:
- Node
- SWA CLI
- Azure CLI
- An Azure Subscription
- An Azure Devops Organization, Project and Repository
- An Azure Resource Manager Service Connection in Devops
Structure
Your structure should be something along the lines of:
docs-hub/
  app/
    docusaurus/
    src/
Go ahead and make the docs-hub folder and the app then src, src\diagrams folders underneath.
CD into the docs-hub folder and create your docusaurus app with the following:
npx create-docusaurus@latest docusaurus classic
You can verify this by running npm start within the docusaurus folder, which will open up a browser window:
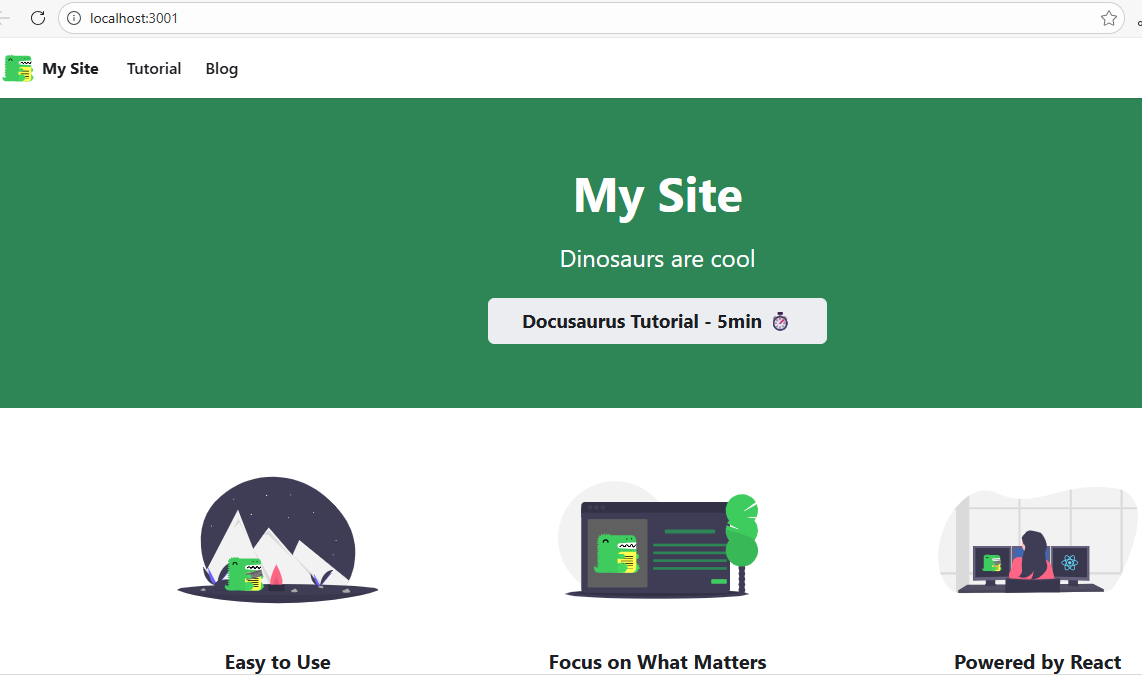
Diagram Integration
Now we have our SWA basics in place, let’s create some simple likec4 diagrams and a component in the SWA to render them.
First, install likec4 into the docusaurus app:
npm i @likec4/core @likec4/diagram likec4
Create a specs.c4 file in src\diagrams with the following:
specification {
    element actor
    element system
    element component
}

model {
    customer = actor "Customer"
    app = system "App" {
        component ui
        component backend

        ui -> backend "calls"

        customer -> ui "uses in browser"
    }
}

views {
    view index {
        include *
    }

    view of app {
        include *
    }
}
This file forms the ‘base’ of the specification for which all projects containing diagrams will reference.
Next, generate the base component to render diagrams, running from the docusaurus folder:
npx likec4 validate
npx likec4 generate react ../../src/diagrams -o ../../docusaurus/src/components/diagrams/likec4.diagrams.js
Now create a page within src\pages called diagrams.tsx to render the generated diagrams that we can navigate to in our SWA:
import { LikeC4ModelProvider } from 'likec4/react'
import { LikeC4View, likec4model } from '../components/diagrams/likec4.diagrams'
import Layout from '@theme/Layout'

export default function Diagrams() {
    return (
        <Layout>
            <LikeC4ModelProvider likec4model={likec4model}>
                <LikeC4View
                    viewId="index"
                    zoomable={true}
                    pannable={true}
                    style={{ width: '100%', height: '100%' }}
                />
            </LikeC4ModelProvider>
        </Layout>
    )
}
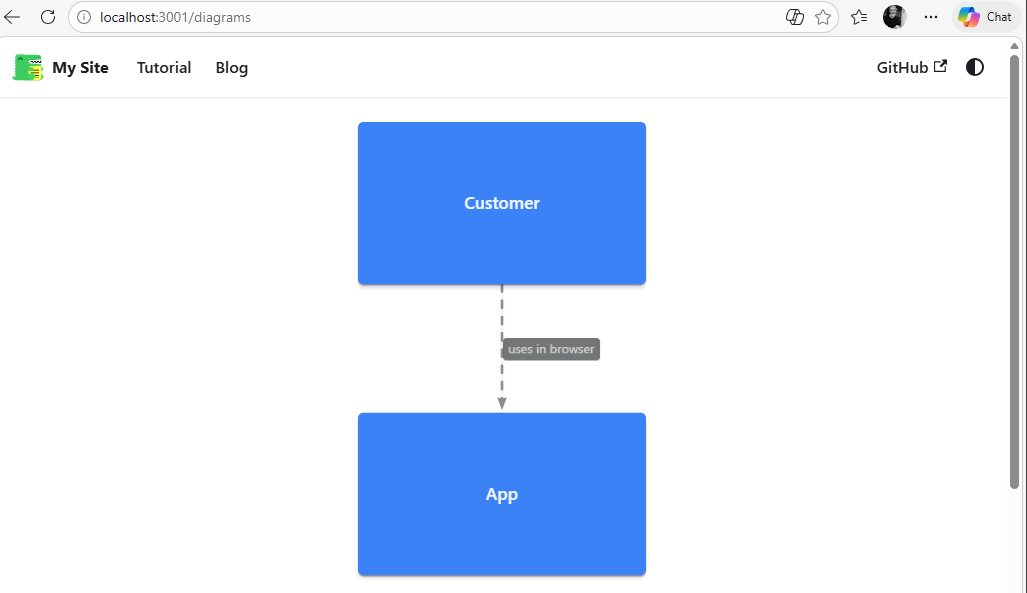
Run npm start and confirm the browser now shows the diagrams, navigating to the /diagrams page:
And with the bare bones of the SWA in place, we can now get a pipeline up and running to deploy the SWA to azure.
Pipeline
Our pipeline requirements are the following:
- Validate any diagrams found.
- Generate the diagrams.
- Build a production version of the SWA.
- Create an artifact of the build.
- Deploy to Azure.
Create a pipeline.yml file within a folder called build in the project root.
Here’s the first few steps defined of pipeline.yml:
variables:
  c4Sources: '$(Build.SourcesDirectory)/app/src/diagrams'
  c4OutputDir: '$(Build.SourcesDirectory)/app/docusaurus/src/components/diagrams'
  webApp: 'docs-hub'

steps:
- task: NodeTool@0
  displayName: Install Node
  inputs:
    versionSpec: '22.*'

- script: npm install -g @azure/static-web-apps-cli
  displayName: Install SWA CLI
- script: npx likec4 validate "$(c4Sources)"
  displayName: Validate Diagrams
- script: npx likec4 generate react "$(c4Sources)" -o "$(c4OutputDir)/likec4.diagrams.js"
  displayName: Generate Diagrams

- script: |
    call npm install
    call npm build
  workingDirectory: $(Build.SourcesDirectory)/app/docusaurus
  displayName: Build SWA App
You’ll notice the commands to validate and generate the diagrams are the same as what we’ve run locally, and additionally we install node on tbe pipeline agent and then build the SWA.
Next, we need to define some SWA config for our environment. As we’re deploying to Azure and we want to use SSO internally, we are only concerned with allowing authentication through Entra - you may want to allow other providers if you wish to do so.
We need to create a new file in the root of our docusaurus app:
touch staticwebapp.config.json
And the following contents:
{
    "trailingSlash": "auto",
    "routes": [
        {
            "route": "/login",
            "rewrite": "/.auth/login/aad",
            "allowedRoles": ["anonymous", "authenticated"]
        },
        {
            "route": "/logout",
            "rewrite": "/.auth/logout",
            "allowedRoles": ["anonymous", "authenticated"]
        },
        {
            "route": "/.auth/login/twitter",
            "statusCode": 404
        },
        {
            "route": "/.auth/login/facebook",
            "statusCode": 404
        },
        {
            "route": "/.auth/login/google",
            "statusCode": 404
        },
        {
            "route": "/.auth/login/apple",
            "statusCode": 404
        },
        {
            "route": "/.auth/login/github",
            "statusCode": 404
        },
        {
            "route": "/.auth/me",
            "allowedRoles": ["authenticated"]
        },
        {
            "route": "/.auth/*",
            "allowedRoles": ["anonymous", "authenticated"]
        },
        {
            "route": "/*",
            "allowedRoles": ["authenticated"]
        }
    ],
    "responseOverrides": {
        "401": {
            "statusCode": 302,
            "redirect": "/.auth/login/aad"
        }
    },
    "auth": {
        "identityProviders": {
            "azureActiveDirectory": {
                "registration": {
                    "openIdIssuer": "https://login.microsoftonline.com/SUB_ID/v2.0",
                    "clientSettingName": "DOCS_HUB_SWA_CLIENT_ID",
                    "clientSecretSettingName": "DOCS_HUB_SWA_CLIENT_SECRET"
                }
            }
        }
    }
}
As you can see, we disable other auth providers by returning a 404 for those oauth paths.
You will also need to replace SUB_ID with your Azure subscription you are going to deploy to. The DOCS_HUB_SWA_CLIENT_ID and DOCS_HUB_SWA_CLIENT_SECRET settings we will come back to shortly.
With this in place, we can now complete the rest of the pipeline steps:
# ...
- task: CopyFiles@2
  displayName: Copy SWA Config
  inputs:
    SourceFolder: '$(Build.SourcesDirectory)/app/docusaurus'
    Contents: |
      staticwebapp.config.json
    TargetFolder: $(Build.SourcesDirectory)/app/docusaurus/build'
    Overwrite: true

- task: ArchiveFiles@2
  displayName: Archive Docs for Consumption
  inputs:
    rootFolderOrFile: '$(Build.SourcesDirectory)/app/docusaurus/build'
    includeRootFolder: true
    archiveFile: '$(Build.ArtifactStagingDirectory)/Docs.zip'

- task: PublishBuildArtifacts@1
  displayName: Publish Docs Artifact
  inputs:
    PathtoPublish: '$(Build.ArtifactStagingDirectory)/Docs.zip'
    ArtifactName: 'Centralized Docs'

- task: AzureCLI@2
  displayName: Deploy SWA
  env:
    SWA_CLI_DEBUG: silly
    SWA_CLI_SERVER_TIMEOUT: 120
    SWA_CLI_APP_NAME: $(webApp)
  inputs:
    azureSubscription: 'your-service-connection'
    scriptType: 'pscore'
    scriptLocation: 'inlineScript'
    inlineScript: |
      swa --version

      $deploymentToken=$(az staticwebapp secrets list --name "$env:SWA_CLI_APP_NAME" --query "properties.apiKey" -o tsv)

      swa deploy -a ./app/docusaurus/build -d $deploymentToken --env production
Here, we copy our SWA config into the production build, create an artifact for deployment, and use the SWA CLI to then deploy the app, using a deployment token we will retrieve from the SWA in Azure. Be sure to enter your Azure service connection name which you will have set up from the pre-req at the top of this page.
Creating the SWA in Azure
With our pipeline complete and ready to go, we need to create an SWA in the Azure Portal and perform an App registration so we can authenticate using the credentials in the pipeline.
Follow the steps below to create an SWA and to register it:
- Create SWA - complete your devops details at the bottom with your Org, Project, Repos and branch. Select the ‘free’ plan.
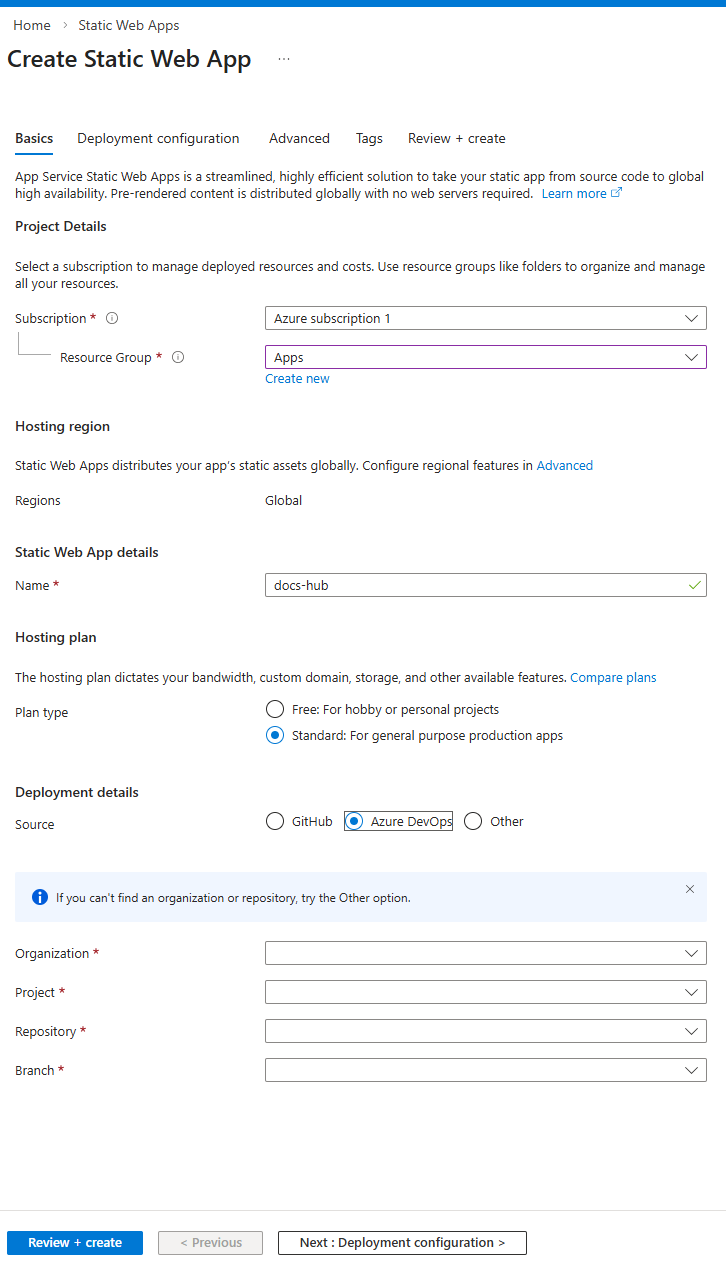
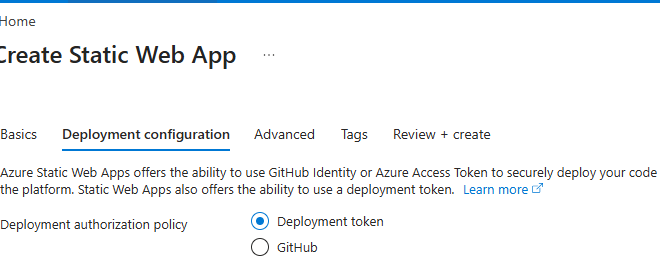
- Select ‘Deployment Token’ as the auth policy
Complete the remaining form steps, and once you navigate to the resource, copy the URL value as you will need this on the app registration page.
Register the App
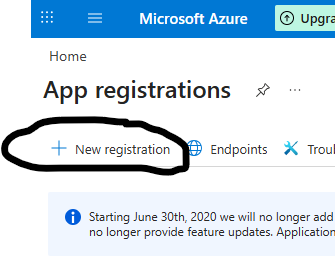
- Go to ‘App Registrations’:
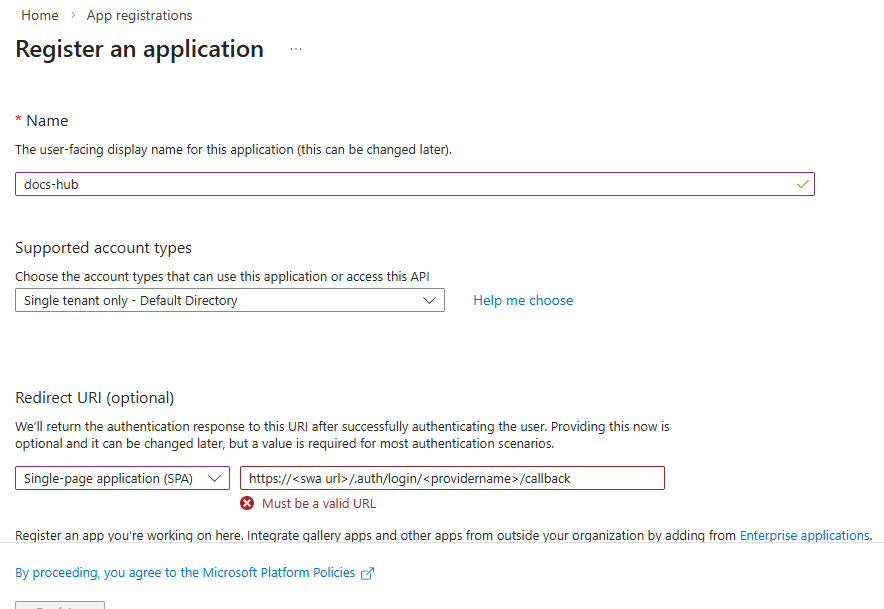
Complete the form as below, and use your URL from above as the prefix before the /.auth part. The provider for entra is aad so ensure you add that in place of providername below:
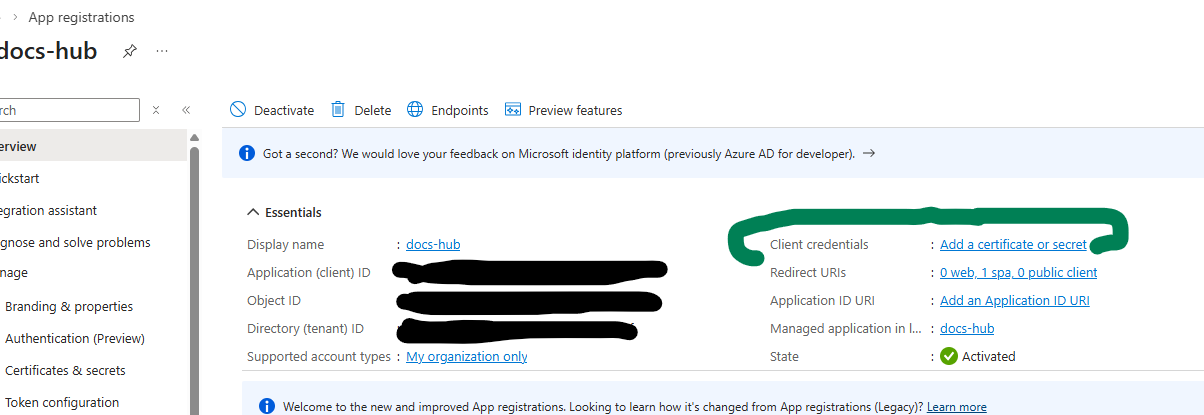
Once complete, take note of the Client ID, and create a client secret, copying this value also:
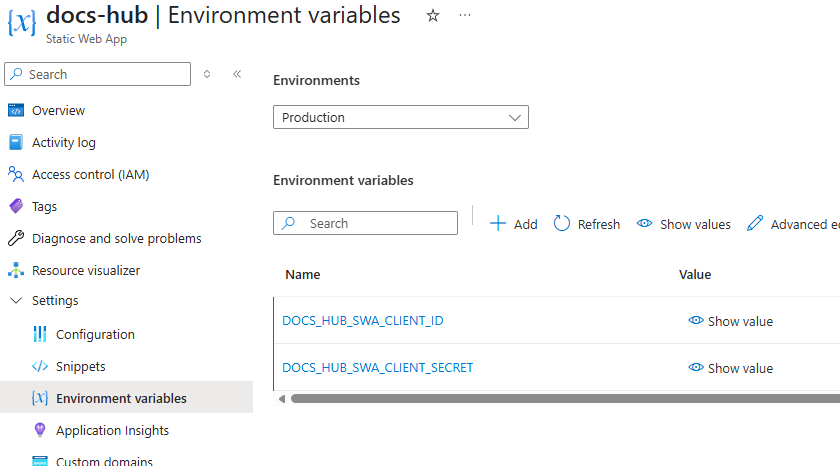
Back in the SWA, we now need to add these as environment variables. Navigate to Settings -> Environment variables, and add 2 entries matching the names we used in the staticwebapp.config.json file above. You should end up with:
Ready for Deployment
Now we have all the infrastructure in place, the last thing we need to do is commit our changes, run our pipeline, and confirm our deployment has been successful.
Look out for the final part of this series where I will go through those final steps of deployment, and show you how to collate diagrams and docs from other projects in Devops and publish them in this central SWA.